Have you ever experimented heating homemade plant milk?
Were the results surprising?
We’ve had some “weird” phenomena happen to us after having heated our homemade concoctions, so I decided to write this article in order to share everything I’ve learnt so far with you, from personal experience and also from your lovely suggestions. When we’re talking main differences between storebought milk and homemade versions, one of the biggest ones is the way they react to heat. Another important one is the nutritional difference between both version, which you can read more about here, although it’s not the topic of today’s article.
Today, I’d like to let you know these few tips and tricks to heat homemade milk and have it turn alright. I hope they’re useful to you when you find yourselves playing with them in the kitchen! And I hope we can all learn some more interesting data about the goodness of plant milks, which isn’t too known, despite the fact that they’ve been around forever.
What happens when you heat homemade plant milks?

Some of them separate into two phases, others sediment and stick to the bottom of the pan, and some of them get too thick and mucous to the point that they no longer resemble milk, but pudding instead.
If it’s thick hot chocolate or creamy sauces you’re after, you can use milks made from grains (oat, rice, buckwheat…), since they’re high in fibre and they become thicker when they’re exposed to heat.
On the other hand, if you’re looking to make a delicious meal and aid in prevention of cardivascular illnesses, you can use nut (almond, hazelnut, walnut…) or seed milk, or even tigernut milk.
These kinds of milks have traditionally been used to make desserts such as cake or rice pudding, and can be found in ancient cooking books. Today, these milks are used in smoothies, milkshakes or coffee drinks.
Here are some tips which will allow you to get the most of your plant milk if you decide to heat it:
• DO NOT BOIL THE MILK: if you do, lots of the nutrients are lost, and the texture might change. Milks such as nut milk, horchata and small seed milks such as hemp, will thin out until they ressemble muddy water. Not very appealing, is it? On the other hand, grain milks such as rice milk tend to get too thick.
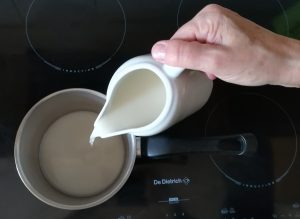
• HEAT ON LOW, ALWAYS: make sure you also stir the milk while you do so, so they don’t stick to the bottom of the pan. Homemade plant milks tend to sediment as they sit, so if you expose them to heat for a long tim (+5 minutes), it’s convenient to stir them afterwards to avoid sedimentation.
• DO NOT REHEAT: if you’ve heated the milk in order to add it to your coffee or tea and you’ve got some left, it’s not convenient to keep it for later, as they tend to go off when exposed to aggressive temperature change.
• IS IT BEST TO HEAT MILK IN THE MICROWAVE OR A SAUCEPAN? plant milk doesn’t behave the same way depending if you’re using a saucepan or the microwave. Here’s a simple scientific explanation provided by Josetxo, a reader of this blog.

When you heat your plant milk in the stove, the heat is transmitted via a solid body which makes the water in any liquid (the milk, in this case) evaporate in layers from the bottom to the the top, reaching the centre last, so the solid part tends to leave a solid fat layer on top of the milk, which doesn’t always look too appealing, as it happens in almond or hazelnut milk.
In a microwave, however, heat isn’t produced via induction, but by indirect radiation. This means that the microwaves make the water molecules inside the milk vibrate, which results in heat production. This way, you get to heat the milk without getting that fat layer on top.
Once you know all the fact, it’s wasy to choose the method you feel it’s best for you!
Thank you Josetxu and everyone else who submitted their suggerences to help us discover the fascinating world of plant milks.
See you soon!
I’ve seen an incredible number of of posts on not overheating plant based milks, and not a single one seems to give the actual temperature at which hemp milk separates on heating. I suspect it is just before the first sign of boiling appears, as on my one attempt, carefully heating, the separation was almost instantaneous as the first bubble appeared, Has anyone got any idea of the best actual temperature to heat hemp milk to make bechamel sauce?
I usually stop at 72C/162F for my milks. Those made of roasted nuts handle higher temperatures but i don’t experiment as 72C/162F meets all my needs.
Hi Antony, thanks for sharing!